What’s the difference between a photo mask and a clipping mask?
A photo mask is the shape, and a clipping mask is the command that puts your photo into that shape. You need both — the photo mask decides what shape your photo will be, and the clipping mask is what joins the two together.
This is where a lot of scrappers get tangled up, and honestly, it’s no wonder. The two names get used interchangeably all over the place (I’ve been guilty of it myself!). But once you see them as a team — one is the thing and the other is the action — everything else about using photo masks falls right into place.
I like to think of it like baking cookies. The photo mask is your cookie cutter, your photo is the dough, and the clipping mask is you pressing down.
How Photo Masks Work
A photo mask uses the shape and transparency of one layer to control how much of the layer above it shows. Wherever the mask has something on it (usually solid black), your photo shows through. Wherever the mask is transparent, your photo is hidden.
The shape can be almost anything — a rectangle, a circle, a torn edge, a painted brushstroke, even a word. And you’re not limited to photos, either. You can clip digital papers, textures, and overlays to a photo mask too.
Most photo masks for digital scrapbooking are black PNG files, because PNGs have the transparency the clipping mask needs to do its job.
The Two Golden Rules
- Rule 1: The photo mask always goes underneath. Your photo (or paper) sits directly above the mask in the Layers panel.
- Rule 2: Your photo must completely cover the mask. If the photo is smaller than the mask, you’ll see bare edges of the mask shape peeking out.
A few more things worth knowing:
- The layers must be right next to each other. You can’t have another layer sitting between the mask and the photo you’re clipping to it.
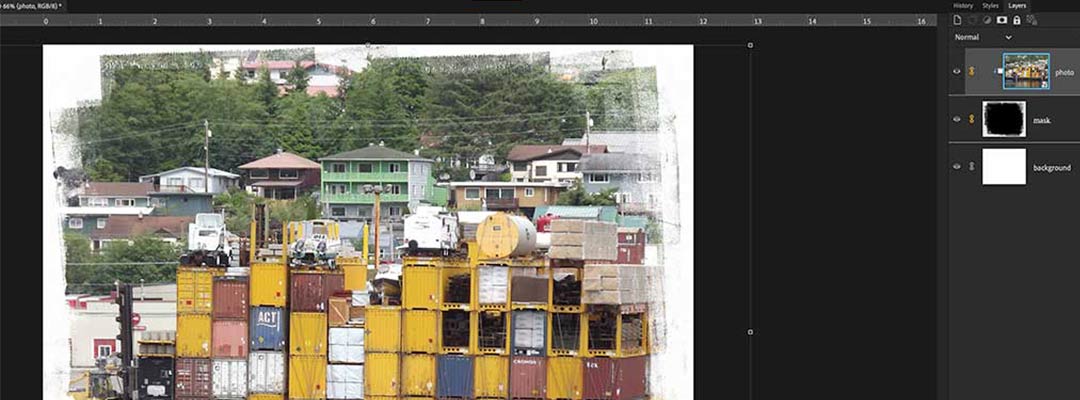
- Once something is clipped to it, the mask layer’s name will be underlined in the Layers panel.
- Any layer clipped to the mask will be indented, with a small clipping icon beside its thumbnail.

How to Use a Photo Mask in Photoshop + Photoshop Elements
The process is nearly identical in both programs.
- Place your photo mask on your page. Open the mask file and drag it onto your layout (or copy and paste it).
- Add your photo directly above the mask. In the Layers panel, drag the photo layer so it sits right on top of the mask layer.
- Resize the photo to cover the mask. Use the corner handles to scale it until the whole shape is covered — remember Rule 2!
- Clip the photo to the mask. Use whichever method you like best:
- Menu: Layer > Create Clipping Mask
- Keyboard shortcut: Ctrl+Alt+G (Mac: Cmd+Opt+G) in Photoshop, or Ctrl+G (Mac: Cmd+G) in Photoshop Elements
- Alt-click: Hold Alt (Mac: Opt) and hover on the line between the two layers. When your cursor changes to a small square with a bent arrow, click once.
- Reposition your photo. Your photo now takes the shape of the mask. Use the Move tool to slide it around inside the shape until you love the crop.
- Link the layers. Select both layers and click the chain icon so they move together.
If you’re using an older version of Photoshop Elements, you’ll find this command listed as Group with Previous instead of Create Clipping Mask. It works exactly the same way.
Should I merge the layers?
You can merge them (Ctrl+E / Cmd+E), but I’d hold off. Once they’re merged, you can’t slide the photo around inside the mask anymore — and I almost always want to nudge something later! Linking keeps everything editable while still letting the layers move as one.
Does This Work in Photopea and Affinity Photo?
Yes! If you’re not using Adobe software, photo masks still work beautifully.
- Photopea (free and browser-based) works just like Photoshop — same menu, same shortcut, same Alt-click trick.
- Affinity Photo handles it a little differently. In the Layers panel, drag your photo layer and drop it onto the mask layer to nest it inside.
Clipping Mask vs. Layer Mask: What’s the Difference?
This is another common mix-up. A clipping mask uses a separate layer — your photo mask — to shape your photo. A layer mask is attached directly to a single layer, and you paint on it with black and white to hide or reveal parts of that layer.
For digital scrapbooking with photo masks, you’ll use clipping masks almost every time. Layer masks are handy for blending edges or hiding part of an element, but that’s a tutorial for another day!
Why Isn’t My Photo Mask Working?
If something’s gone sideways, it’s almost always one of these:
- My photo disappeared. Your photo is probably below the mask instead of above it. Drag it up so it sits directly on top, then clip again.
- Only part of the shape is filled. Your photo isn’t big enough to cover the mask. Scale it up until it covers the whole shape.
- My photo clipped to the wrong layer. Another layer is sitting between the photo and the mask. Move the photo so it’s directly above the mask.
- I see a square instead of the shape. The mask may be a JPG instead of a PNG. JPGs have no transparency, so the whole square becomes the shape.
- The photo and mask won’t move together. Link the layers (step 6), or select both layers before you move them.
To undo a clip at any time, go to Layer > Release Clipping Mask.
Fun Ways to Play with Photo Masks
- Clip a paper on top of your photo. You can stack more than one layer on a single mask. Clip your photo to the mask, then clip a digital paper above the photo and play with the blend mode and opacity. It’s a lovely way to add texture.
- Use built-in shapes as masks. Photoshop and Elements both come with a whole library of custom shapes. In Elements, you’ll find the Custom Shape tool in the Draw section of the toolbar. In Photoshop, it’s nested with the Rectangle tool.
- Try painted edges. Brushy, painted photo masks give your pages an artsy, mixed-media feel.
Photo masks are the secret behind a lot of other techniques, too. If you enjoyed this one, try these next:
Photo Masks in My Shop
I’ve got a whole collection of photo masks in my Oscraps shop, from simple shapes to torn and painted edges. Here are a few favorites:
If you try this tutorial, I’d love to see what you make! Share your page in my Oscraps gallery.


Ready for Your Next Page?
Learning a new technique is the easy part — finding the spark to actually sit down and use it is another story. If you’ve been feeling stuck, Begin Anywhere is my free 7-day email series of creative prompts to help you get back to your pages, one small step at a time.
And if you’re ready to go a little deeper, visit Start Where You Are for practical guides to getting unstuck and making pages you love.
Great tip! I’ve used rectangles and other shapes as a mask to “crop” a photo but didn’t think about doing this.
So glad you liked my tip, Tawyna!