
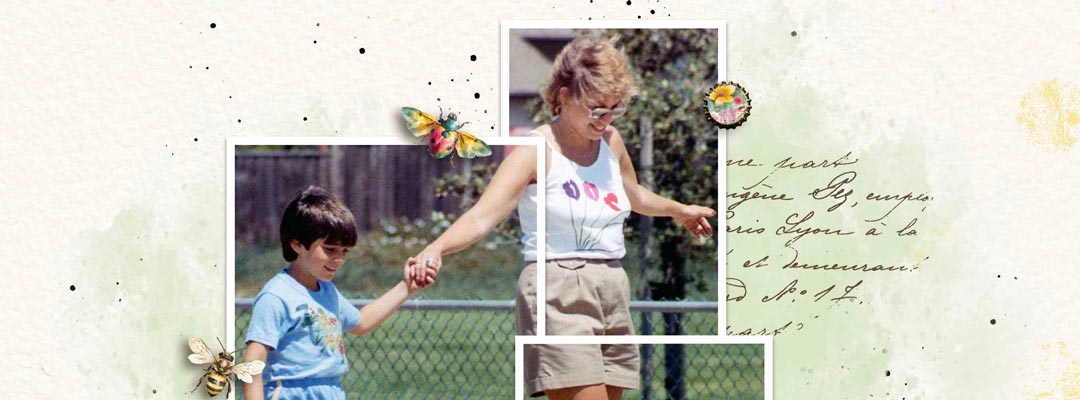
Turn One Photo into a Showstopper
with the Interlocking Frames Effect
Ever look at a photo and think, this needs a little something extra? Today I’m showing you how to create the Interlocking Frames Effect in Photoshop Elements—a simple trick that makes a single photo look like multiple, overlapping frames. It’s fast, fun, and a great way to direct the eye to your favorite details while trimming out visual noise.
We’ll use masks, groups, and a clean stroke frame to build the illusion. If you’re a digital scrapbooker or art journaler who loves an elegant “wow,” this one’s for you.
What Is the Interlocking Frames Effect?
The interlocking frames effect makes it appear as if different parts of a single photo are passing through separate frames. In reality, it’s one image cleverly masked and framed multiple times. The result is dynamic, polished, and perfect for layouts where you want to highlight faces, hands, flowers, or movement—without adding lots of extra elements.
- Focus on your story’s most important details
- Crop away distractions (fences, houses, messy backgrounds)
- Turn an “okay” photo into a layout centerpiece
See It in Action
Here are a few places this shines:
- Family moments where an arm or hand seems to reach “through” one frame into another
- Travel photos—highlight flowers and sunsets, skip the clutter
- Floral studies—turn a single rose photo into a striking triptych


Why This Technique Works So Well
Our eyes love order and emphasis. Multiple frames create rhythm, while the overlaps add energy. By spotlighting just the good stuff—hands clasping, petals catching light, faces in motion—you simplify the story and make it more impactful. That’s the design magic. And if you’re ever staring at your screen wondering what to create next, I’ve got 15 strategies to help you find your inspiration again — because sometimes the block isn’t about technique, it’s about knowing where to start
How to Choose the Right Photo for Interlocking Frames
Not every photo works equally well with this effect. The best candidates have a clear subject with some visual breathing room around it — something you can isolate across multiple frames without losing the heart of the story. Photos with strong lines, interesting hand or body positions, or natural depth (like a flower in the foreground with a blurred background) tend to shine. Busy backgrounds actually work in your favor here, because the frames let you crop them away and keep only the good stuff. Avoid photos where the subject is tiny in the frame or where everything is equally important — the whole point is directing the eye. If you’re not sure whether a photo will work or not, try holding your hands up in front of the photo like a frame and moving them around. If certain sections look great on their own, you’ve found your photo.
➞ Check out my YouTube video to see how simple this technique is — here’s a quick overview:
Quick Reference Checklist
- Rectangular Marquee selection → Fill on a new layer (black)
- Clip the photo to the rectangle
- Layer Style > Stroke (white, Inside)
- Group photo + rectangle → Duplicate groups
- Turn off Auto Select Layer → Move the rectangle inside each group
- Rename groups (Top, Middle, Bottom) and fine-tune overlaps
Ready to Try It?
Try the effect on one of your photos and watch your layout come to life. For coordinating supplies, take a peek at my collection The Garden Within Mega Kit → which was used to create both the sample page the video and the floral sample page above.
You’ll find other sample pages made using The Garden Within in my designer gallery.

Your Turn
Will you use the Interlocking Frames Effect on your next layout? Tell me what photo you’re thinking of—travel, florals, family—and how you’ll frame it!
Love tutorials like this? Subscribe on YouTube so you don’t miss the next one.
Thanks for this fabulous tutorial. I love the connecting frames along with your choice of photos. (I am using a different email for these tutorials.) Hugs 🙂
Hello my friend! So nice to hear from you! I’m thrilled you like the tutorial! Let me know if you like it!
Love this Interlocking Frames Effect idea. Can it work in Photoshop? I don’t have PS Elements.
Also, I went to the ‘Subscribe on YouTube’ for more tutorials like this and it said it was not available.
So glad you liked the tutorial, Sonya! And yes! It works the same way in Photoshop! I’ve fixed the “subscribe to my YouTube channel” link. Thanks for letting me know, Xo